
CWT Software Configuration Handbook
This is an Example: setup for a terminal with two articles for parking where each article can represent parking in a specific block or area.
The first article has one tariff connected to it while the second article has two alternative tariff packages connected, which is often the case when there is residential parking in combination with regular parking and with different tariffs.
During the payment process the user will be requested to enter a unique identification string, a license plate number for Example:, that in some way identifies the end user or the end user’s vehicle. This information can be used in WebOffice or other external systems connected.
Start with the basic setup created in Example: 1: Basic setup. Because there will be multiple articles in the system set articleChoice=”true” (see Example 1 Step 6) to enable selection of articles via the user interface.
The attribute paymentServiceChoice can still be set to “false” because only one payment service is required.
If the attribute defaultArticleId is removed from the CORE element the terminal will require an active selection of article in the user interface before payment can start. This is because no default has been defined.
The settings in this Example: forces the user to select an article with buttons in the user interface before a payment can start:
1.PAYMENT ELEMENT
Start with adding the PAYMENT element to the XML document.
Tick factor
Set the tick factor to match the monetary setup that is required for the terminal. If the currency is “EUR” and you want 1 cent to be the lowest denomination, set tickFactor=”100”.
2.Currency
Set currency to the numerical value according Valid currencies.
3.Default VAT
Set attribute default VAT to the integer value multiplied by 100 for the VAT (for 20 % default VAT the value shall be defaultVAT=”2000”). The default VAT is applied to all articles that do not specify a specific VAT value.
4.Default purchase category
Purchase category specifies what the CWT sells (see Valid Purchase Categories for a complete list of codes) and the attribute defaultPurchaseCategory shall reflect the purchase category that is sold most frequently in the terminal. This example represents a CWT that sells parking tickets thus defaultPurchaseCategory="10").
In your XML document you should now have a PAYMENT element containing tick factor 100, EURO as currency, a default VAT at 20 % and a default purchase category that is 10 for parking:
<PAYMENT tickFactor="100" currency="978" defaultVAT="2000" defaultPurchaseCategory="10"/>
5.PAYMENT SERVICE ELEMENT
Add one payment service by defining a PAYMENTSERVICE element in the configuration. This defines how the CWT sells the articles and how the payment can be done.
6.Payment service id
For the one and only payment service set paymentServiceId=”0”.
7.Payment service name
The name attribute can be set to paymentServiceName=“ParkingPS”.
8.Article choice (via the user interface)
Depending on the user interface configuration the name of the payment service can be presented to the end user via the user interface.
Because there are multiple articles in this setup, the end user shall select an article via the user interface. Therefore, set articleChoice=”true”.
9.Default article id
Set defaultArticleId=”-1” to avoid having any default article and force the user to actively select an article to buy via the user interface.
10.Tariff choice
The user should be able to select a tariff package because the first article will have two possible tariff packages connected and the user may want to select a second tariff package, which often is the case with residential parking. Therefore, set tariffChoice=”true” or the system will not allow tariff package selection via the user interface.
11.Ticket
To get a ticket printed after each purchase set ticket=“Yes”.
12.Step
Set step=“false” because the payment service does not require the amount to be stepped up before the pay units are activated for payment (like EMV terminals that require a fixed amount when payment is started).
13.User identifier
Set userIdentifier=”Code” because the end users are required to enter a code (like license plate number) during the purchase for identification in WebOffice or other external systems connected to WebOffice.
14.Pay unit(s)
Pay units that shall be active in the payment service shall be defined as sub-elements inside the payment service element. Both coin and card pay units are used in this Example: setup so set name="Coin" and name="Card".
You should now have a payment service element like this:
<PAYMENTSERVICE paymentServiceId="0" name="ParkingPS" articleChoice="true"
tariffChoice="true" ticket="Yes" step="false" userIdentifier="Code"
defaultArticleId="-1">
<payUnit name="Coin"/>
<payUnit name="Card"/>
</PAYMENTSERVICE>
It is now time to define the two pay units that the PAYMENT SERVICE element (see Step 14 Pay units) refers to. Both a coin unit and a card unit have to be defined. The card unit is quite easy to define because it does not require any mapping of ticks to channels. The coin pay unit, however, requires that all active channels are mapped to a tick value that corresponds to the monetary value of the channel.
15.Name and type
Set cardPayUnitName=“Card” and type=“Card”. This applies to the coin pay unit as well but the name and type shall then be “Coin” instead.
16.Channel mapping
If the coin unit handles the EURO currency and is setup to active channel 0 for 50 cent coins, channel 1 for 20 cent, channel 2 for 1 EURO and channel 3 for 2 EURO shall channel 0 give 50 ticks, channel 1 give 20 ticks, channel 2 give 100 ticks and channel 3 give 200 ticks. The tick factor is set to 100 in the PAYMENT element (see PAYMENT element Tick factor) which means that 1 EURO is 100 ticks.
The channel mappings are defined as a channel sub-element inside the coin pay unit definition. One channel element must be defined per active channel in the physical coin validator. See PAYUNIT element for details on how to set up a pay unit.
The coin pay unit with the channel mapping described above should now look like this:
<PAYUNIT name="Coin" type="Coin">
<channel id="0" value="50"/>
<channel id="1" value="20"/>
<channel id="2" value="100"/>
<channel id="3" value="200"/>
</PAYUNIT>
The card pay unit shall look like this since it doesn’t require any mapping of channels of the physical pay unit to tick values:
<PAYUNIT name="Card" type="Card"/>
17.TARIFFPACKAGE ELEMENT
Three different tariff packages must be defined as price models for the articles that the terminal sells.
The tariff packages defined have id 0, 1 and 2 and the names are set to “ParkingTariff1”, “ParkingTariff2” and “ParkingTariff3”. In some applications the tariff package names can be displayed to the end user via the user interface.
The prices are 100 ticks per 60 minutes in the first tariff package, 200 ticks per 60 minutes in the second and 300 ticks for 60 minutes in the third tariff package for parking from 8:00:00 to 17:59:59 (not including 18:00:00) every day. With tickFactor=”100” (set in the PAYMENT element in 0 Tic factor) this means 1 EURO per hour in the first tariff package, 2 EURO per hour in the second and 3 EURO per hour in the third tariff package. There is also a minimum purchase time requirement of 60 minutes in all the tariff packages. When the purchased time is equal or greater than 60 minutes it will be possible to finish the purchase.
18.Ticket type and id
Besides the actual tariff script in the tariff sub-element, a reference to a ticket layout is required because a ticket shall be printed after each purchase. The actual ticket layout is not yet defined but it is still possible to make a reference to it.
Set ticketType=“PrePayCheckIn” because the payment service is setup as pre-payment with code input during the purchase (license plate number for instance.). Set ticketId=”0” which must match the id of the ticket layout definition when defined in Step 28. All three tariff packages are connected to the same ticket id since the setup doesn’t require different layouts of the ticket for the different tariff packages.
19.Description
A description row (with two columns) is set up in the tariff packages. The description reads “All days:” in the first column and “1€/h”, “2€/h” and “3€/h” in the second column for the three different tariff packages respectively.
The descriptions will be displayed as tariff description in the user interface if the user interface is designed to display tariff descriptions.
See TARIFFPACKAGE element and Tariff calculation for details regarding the TARIFFPACKAGE syntax and information on how tariff scripts are defined. The three different tariff packages should look like this:
<TARIFFPACKAGE name="ParkingTariff1" tariffPackageId="0" >
<ticket ticketType="PrePayCheckIn" ticketId="0"/>
<description row="0" col="0" string="All days:"/>
<description row="0" col="1" string="1€@/@h"/>
<tariff>
PACKAGE "ParkingTariff1";
min units = 60;
INTERVAL "EveryDay8To16";
timepredicate = "($hour in [08 to 16[)";
tariffrate = linear 100 per 60;
</tariff>
</TARIFFPACKAGE>
<TARIFFPACKAGE name="ParkingTariff2" tariffPackageId="1" >
<ticket ticketType="PrePayCheckIn" ticketId="0"/>
<description row="0" col="0" string="All days:"/>
<description row="0" col="1" string="2€@/@h"/>
<tariff>
PACKAGE "ParkingTariff2";
min units = 60;
INTERVAL "EveryDay8To16";
timepredicate = "($hour in [08 to 16[)";
tariffrate = linear 200 per 60;
</tariff>
</TARIFFPACKAGE>
<TARIFFPACKAGE name="ParkingTariff3" tariffPackageId="2" >
<ticket ticketType="PrePayCheckIn" ticketId="0"/>
<description row="0" col="0" string="All days:"/>
<description row="0" col="1" string="3€@/@h"/>
<tariff>
PACKAGE "ParkingTariff3";
min units = 60;
INTERVAL "EveryDay8To16";
timepredicate = "($hour in [08 to 16[)";
tariffrate = linear 300 per 60;
</tariff>
</TARIFFPACKAGE>
20.ARTICLE ELEMENT
This sample setup shall have two different articles defined that represent parking in two different blocks.
21.Article id
Each article is defined by an ARTICLE element. The identities of the two articles should be 0 and 1.
22.Article name
The article name should reflect what the article is. In this case it is parking in two different blocks so set the names name=“ParkingBlock1” and name=“ParkingBlock2”.
Since one of the two tariff packages shall be connected to the article with article id 0 and the other tariff package shall be connected to the article with article id 1, two article tariff groups must be used and connected to each article.
23.Use of common tariffs
To use a defined article tariff group for connection of tariff packages instead of a common tariff group set useCommonTariffs=”false”.
24.Default tariff id
Set the default tariff package for the article with id 0 to tariffPackageId=”0” while the tariff package with id 1 shall be selectable as a special tariff for residential parking for Example:.
The second article (id 1) will only have one tariff package (id 2) connected.
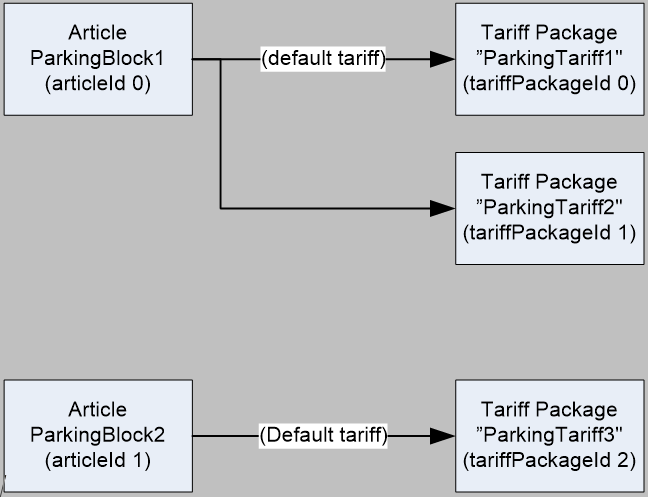
Figure 27. Connecting articles to tariff packages.
25.Default VAT and default purchase category
Since default VAT and default purchase category were defined in the PAYMENT element in Step 3 and Step 4 it is not necessary to define VAT and purchase category for these articles (if not explicitly defined for the articles the default VAT and default purchase category values from the PAYMENT element will be used for the articles).
26.Payment service
A reference to which payment services that are allowed to sell the article must be set. Only one reference is required because there is just one payment service defined (see Example 2 step 7 Payment service id and Example 2 step 8 Payment service name). Create the reference by adding a paymentService sub-element to each ARTICLE element and set id equal to the payment service id defined in the PAYMENT SERVICE element in Step 3.6 (in this case set id=”0”).
The two ARTICLE elements should then look like this:
<ARTICLE articleId="0" name="ParkingBlock1" useCommonTariffs="false"
defaultTariffId="0">
<paymentService id="0"/>
</ARTICLE>
<ARTICLE articleId="1" name="ParkingBlock2" useCommonTariffs="false"
defaultTariffId="1">
<paymentService id="0"/>
</ARTICLE>
27.ARTICLE ELEMENT
Connections between the two articles and the tariff packages shall now be created by defining a different article tariff group for each article.
Two tariff packages shall be added for the first article tariff group (for the article with id 0). Only one package need to be added for the article with id 1.
Set articleTariffGroupId=”0” in both article tariff groups since it is the first group for both articles.
The tariff package references are created as button controlled packages since the end user shall be able to select tariff package via the user interface for the article with id 0.
Selection of tariff package via the user interface is not required for the article with id 1, but the reference in the article tariff group is still created as button control.
Create the references by adding the buttonControlledPackage sub-element to the two article tariff groups and set id=”0” for the first button controlled package and id=”1” for the second. Then make sure that the tariff package name is equal to the name of the defined tariff package in the system.
The definitions of the two article tariff groups should look like this:
<ARTICLETARIFFGROUP articleTariffGroupId="0" articleId="0">
<buttonControlledPackage id="0" tariffPackageName="ParkingTariff1"/>
<buttonControlledPackage id="1" tariffPackageName="ParkingTariff2"/>
</ARTICLETARIFFGROUP>
<ARTICLETARIFFGROUP articleTariffGroupId="0" articleId="1">
<buttonControlledPackage id="0" tariffPackageName="ParkingTariff3"/>
</ARTICLETARIFFGROUP>
28.TICKET ELEMENT
The last step is to create a ticket layout definition related to the ticket to be printed after each successful purchase. The layout identity must be set as ticketId=”0” to match the ticket id that is referenced in the TARIFFPACKAGE definition in Step 3.18 Ticket type and id. This ticket will be printed in landscape orientation. The height of the printing area is 300 pixels and the width is 380 pixels. The layout is very simple and the only text that is printed on this sample ticket is “Sample Ticket” in font size 36. To create more advanced ticket layouts please see Ticket element and Ticket layout.
The left margin is set to 25 pixels and the right, top and bottom margins are set to 0 pixels.
The ticket layout definition should look like this:
<TICKET ticketId="0" height="300" width="380" orientation="Landscape"
layout="@y12@f36@fbSample Ticket">
<margin left="25" right="0" top="0" bottom="0"/>
</TICKET>
