| Important: To Create a Purchase Receipt Template for a Terminal Group, first create a Terminal Group of type ‘Custom Purchase Receipt’ and assign the terminal(s) to it. When creating a template from scratch , it is very important that you have good knowledge of the HTML language to get the layout exactly as you want it. 1 - The whole template as you see it in the editor is places inside the <body> element. 2 - It is not possible to use style sheets. This makes it hard to place <div> elements exactly where you want them. |
Click the Insert button to open the Purchase Receipt Template details page. The fields are described below the image.
| Recommended: When creating a new template, you can select an existing template from the "Load existing template" drop-down box. This gives you access to all the possible fields to add to a template. Note: The page can be viewed in Design layout, HTML layout, or as a preview. When viewing a preview, the layout will axiomatically be saved. |
| See Cale Default Purchase Receipt template for a description of the Cale Default Template. |
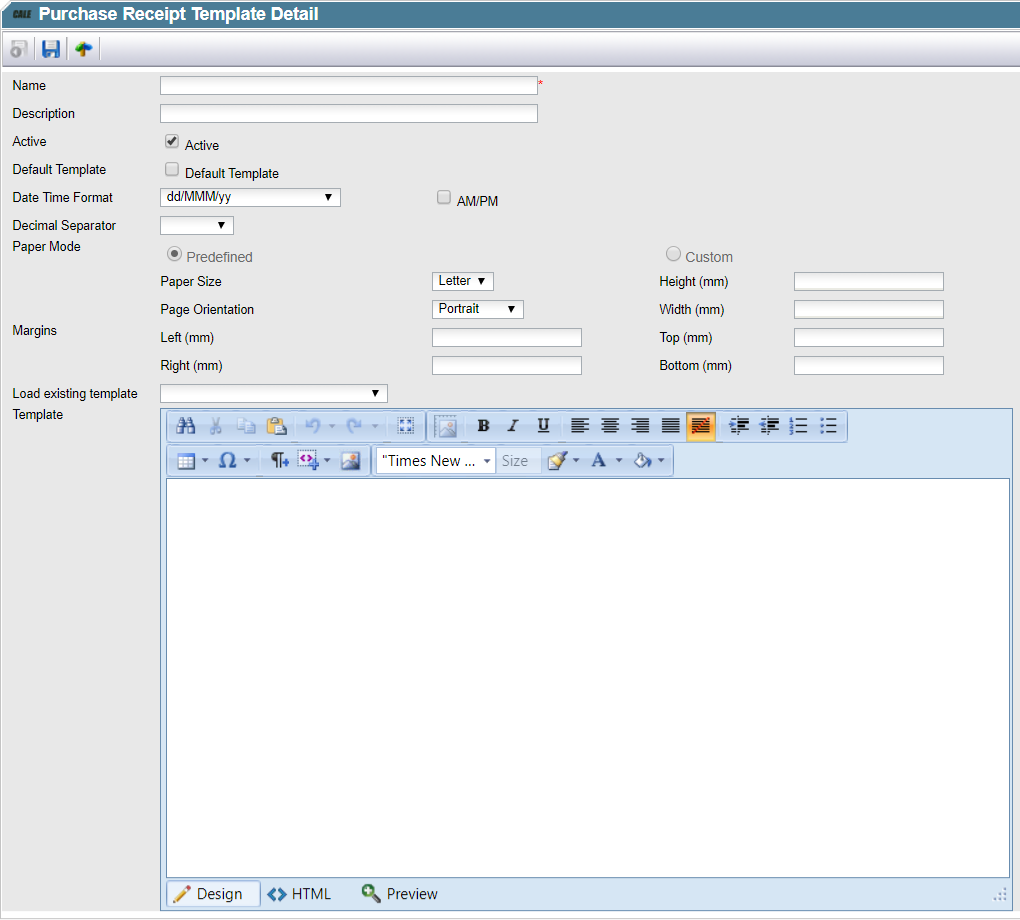
Field description
Field |
Explanation |
||||||||||||||||||||
|---|---|---|---|---|---|---|---|---|---|---|---|---|---|---|---|---|---|---|---|---|---|
|
The Save & back button is disabled until you saved the template. After saving this button becomes available and the page is extended with the Terminal Groups Section. |
||||||||||||||||||||
|
Save Button. |
||||||||||||||||||||
|
Navigation icon. See Navigation Icon (Signpost). |
||||||||||||||||||||
Name. |
The name of the Template must be unique within the company. |
||||||||||||||||||||
Description. |
Optionally add a descriptive text to the template. |
||||||||||||||||||||
Active. |
Default each created template will be set to active. If you are preparing a template but do not want to use it now remove the checkmark. |
||||||||||||||||||||
Default Template. |
Check this checkbox to create a companywide default template. Only one template can be set as default. |
||||||||||||||||||||
Date Time Format. |
The Date Time format selected will be used as format for all date and time fields. The following date formatting codes are used:
Example: The format dd-MMM-yyyy will display as 01-Jan-2014. The format MMM/dd/yy will display as Jan/01/2014. The format MM/dd/yy HH:mm will display as 01/01/2014 11:35 To set the time in AM/PM format mark the Checkbox AM/PM. |
||||||||||||||||||||
Paper Mode. |
This set of fields allows you to set the paper format to use. Select a predefined format or create your own one. |
||||||||||||||||||||
Margins. |
Set the margins in millimetre. These fields are default empty. When left empty, the printing of the receipt will start on the left most side of the paper. Some printers do not support this. E.g., Word uses a standard of 25.4 mm. |
||||||||||||||||||||
Load existing format. |
This drop-down box will list all the previously defined templates; and can be used to populate a new template. When creating the first template only the default CWO2DefaultTemplate will be available. This option is only available when creating a new template. |
||||||||||||||||||||
Template. |
This is the place where you create your template.  The following extra buttons are available next to the standard formatting buttons:
|


HTML Tips.
When working with a layout based on tables it is very hard to see the results when working in the editor. to get around this:
•Set the border="1" parameter in <table width="1645" style="border-collapse: collapse; font-size: 28px;" border="1"> to make the borders of the table visible. Use the border-collapse style to only get a thin line.
•Select all code and copy it to an external HTML editor with a preview option.
List of available fields.
Labels |
Datafield |
Description |
|---|---|---|
|
[HeaderContactInformation] |
Header for the Contact information section. |
|
[HeaderTransactionDetails] |
Header for the Purchase data section. |
|
[HeaderTransactionReceipt] |
Overall header for the Receipt. |
[LabelAddress1] |
[DataAddress1] |
Address part 1. |
[LabelAddress2] |
[DataAddress2] |
Address part 2. |
[LabelArticleID] |
[DataArticleID] |
The Article ID of the Article used. |
[LabelArticleName] |
[DataArticleName] |
The name of the article used. |
[LabelAuthorizationNo] |
[DataAuthorizationNo] |
Bank Authorization number. |
[LabelBankAuthorizationRef] |
[DataBankAuthorizationRef] |
Bank Authorization ID. |
[LabelCardFeeAmount] |
[DataCardFeeAmount] |
Fee paid on the card transaction. |
[LabelCardIssuer] |
[DataCardIssuer] |
Card Issue. |
[LabelCardNumberMP] |
[DataCardNumberMP] |
Masked Card number. |
[LabelCheckInLocation] |
[DataCheckInLocation] |
Terminal Location of the Checkin action. |
[LabelCheckOutLocation] |
[DataCheckOutLocation] |
Terminal Location of the Check out action. |
[LabelCity] |
[DataCity] |
City. |
[LabelCode] |
[DataCode] |
Code field commonly containing the Licens Plate. |
[LabelCompanyName] |
[DataCompanyName] |
Name of the Company. |
[LabelContactEmail] |
[DataContactEmail] |
email address of the contact person in your company. |
[LabelContactName] |
[DataContactName] |
Name of the contact person in your company. |
[LabelContactPhone] |
[DataContactPhone] |
Phone number of the contact person in your company. |
[LabelCountryName] |
[DataCountryName] |
Country name. |
[LabelCurrencyCode] |
[DataCurrencyCode] |
Currency code. |
[LabelDescription] |
[DataDescrption] |
Content of the Purchase Description field |
[LabelEndDate] |
[DataEndDate] |
End date of the parking session. |
[LabelEvDeliverableConsumedEnergy] |
[DataEvDeliverableConsumedEnergy |
The energy consumed |
[LabelEvDeliverableDuration] |
[DataEvDeliverableDuration] |
Duration of the cgarging session |
[LabelEvDeliverableEndDateUtc] |
[DataEvDeliverableEndDateUtc] |
The end date and time of the charging session |
[LabelEvDeliverableStartDateUtc] |
[DataEvDeliverableStartDateUtc] |
The startd date and time of the charging session |
[LabelEvDeliverableStatusName] |
[DataEvDeliverableStatusName] |
The status of the charging session. Will be completed when the session is ended. |
[LabelEvDeliverableTypeName] |
[DataEvDeliverableTypeName] |
The type of charging used: •None •Charge by Time •Charge by Consumption •Park & Charge by Time •Park & charge by consumption |
[LabelExternalID] |
[DataExternalID] |
Lists the external ID received from a service provider. |
[LabelHourlyRateDescription] |
[DataHourlyRateDescription] |
describes the hourly rate (e.g. $2.00) |
[LabelNetAmount] |
[DataNetAmount] |
Amount of the purchase excluding the Card fee but NOT the VAT. |
[LabelOriginCountryState] |
[DataOriginCountryState] |
The country / state from the buyer |
[LabelParkingSpace] |
[DataParkingSpace] |
Parking Space ID. |
[LabelPayUnit] |
[DataPayUnit] |
Pay unit used for the payment. |
[LabelPostPaymentCheckoutType] |
[DataPostPaymentCheckoutType] |
The way the Post payment transaction is checked out. |
[LabelPostPaymentTerminalGroup] |
[DataPostPaymentTerminalGroup] |
Terminal group of the post payment transaction. |
[LabelPostPaymentTransactionId] |
[DataPostPaymentTransactionId] |
Post Payment transaction ID. |
[LabelPostPayUserAccManCheckout] |
[DataPostPaymentUserAccountManualCheckout] |
User ID when executing a post payment check out via WebOffice. |
[LabelPurchaseAmount] |
[DataPurchaseAmount] |
Total paid amount. |
[LabelPurchaseDate] |
[DataPurchaseDate] |
Date of the purchase. |
[LabelPurchaseState] |
[DataPurchaseState] |
State of the purchase. Commonly completed. |
[LabelRegionName] |
[DataRegionName] |
The name of the region. |
[LabelStartDate] |
[DataStartDate] |
Start date of the purchase. |
[LabelTariffPackageID] |
[DataTariffPackageID] |
ID of the Tariff Package used. |
[LabelTariffPackageName] |
[DataTariffPackageName] |
Name of the Tariff Package used. |
[LabelTerminal] |
[DataTerminal] |
Terminal ID. |
[LabelTerminalLocation] |
[DataTerminalLocation] |
The location of the terminal as set in Terminals |
[LabelTicketNumber] |
[DataTicketNumber] |
Ticket number of the purchase. |
[LabelTransactionReceipt] |
[DataTransactionReceipt] |
Transaction receipt of the purchase. |
[LabelTransactionReference] |
[DataTransactionReference] |
Transaction reference of the purchase. |
[LabelVat%] |
[DataVat%] |
Vat% of the Vat used. Note: 2500 means 25%. |
[LabelVat1] |
[DataVat1] |
The purchase VAT 1 value. |
[LabelVat2] |
[DataVat2] |
The purchase VAT 2 value. |
[LabelVat3] |
[DataVat3] |
The purchase VAT 3 value. |
[LabelVat4] |
[DataVat4] |
The purchase VAT 4 value. |
[LabelVatRegistrationNo] |
[DataVatRegistrationNo] |
No of the Vat Registration used. |
[LabelVatTotal] |
[DataVatTotal] |
VAT 1 + VAT 2 + VAT 3 +VAT 4 |
[LabelZipCode] |
[DataZipCode] |
Zip code of the address of the company. |